
iPhone DFU mode, or Device Firmware Update mode, is an important feature in iOS devices that allows the iPhone to communicate with iTunes or other software to update, restore or jailbreak the firmware. This mode is essential in troubleshooting various software issues that a user may face on their iPhone, iPad, or iPod Touch.
One of the main advantages of iPhone DFU mode is that it allows the user to restore the device to its original factory settings without updating the OS (operating system). This can be particularly useful when a user encounters issues on their iPhone or iPad such as a frozen screen, iPhone stuck on Apple logo, unresponsive touch screen, rebooting or software crashes. In such cases, entering DFU mode can help fix the problem and restore the device back to its normal working state.
DFU mode is also critical when it comes to jailbreaking an iOS device. By entering DFU mode, iPhone/iPad users can bypass the standard restrictions and install third-party applications and software. This can help users customize their device to their liking and unlock the iPhone/iPad to its full potential.
Moreover, the DFU mode also provides a way to upgrade or downgrade the iPhone’s firmware version. This can be particularly useful for users who prefer a particular version of iOS and want to use it on their iPhones.

In summary, DFU mode is an essential feature that provides users with a way to troubleshoot various software and hardware issues, restore their device to its original factory settings, jailbreak their iOS device, and upgrade or downgrade the firmware version. It is a critical tool that can help users maintain their iOS device and ensure it functions correctly.
The process for making an iPhone enter DFU mode can vary depending on the model of your iPhone. In this post, we will outline the steps to enter DFU mode on the three categories of iPhones: iPhone 6S and earlier, iPhone 7 and 7 Plus, and iPhone 8 and later. So let’s get started!
For iPhone 6S and earlier:
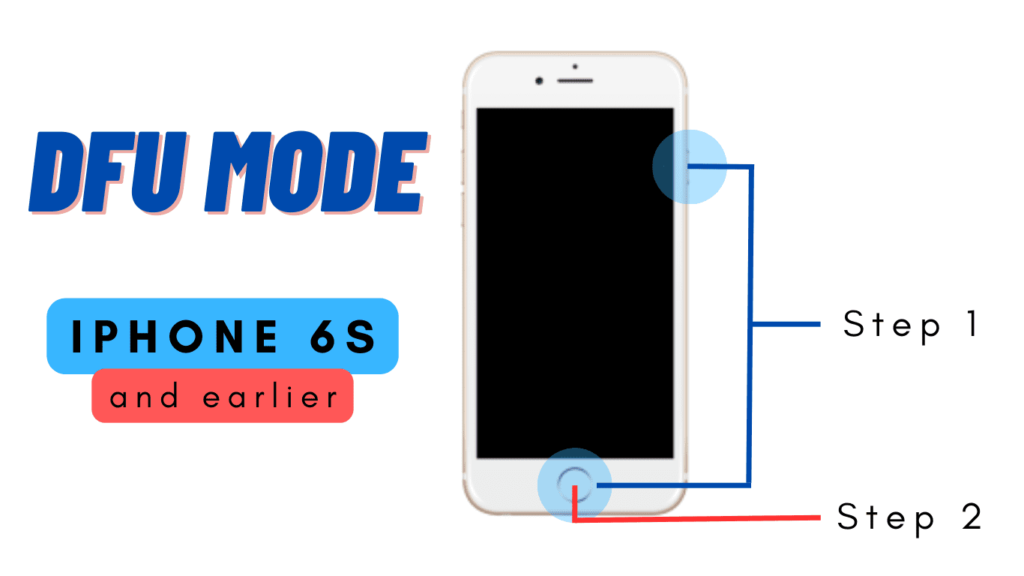
- Connect your iPhone to your computer using a USB cable and open iTunes if connected to windows laptop or a mac running macOS Mojave or earlier. On a Mac running macOS Catalina or newer, just open Finder.
- Press and hold the Power button and the Home button at the same time for 8 seconds.
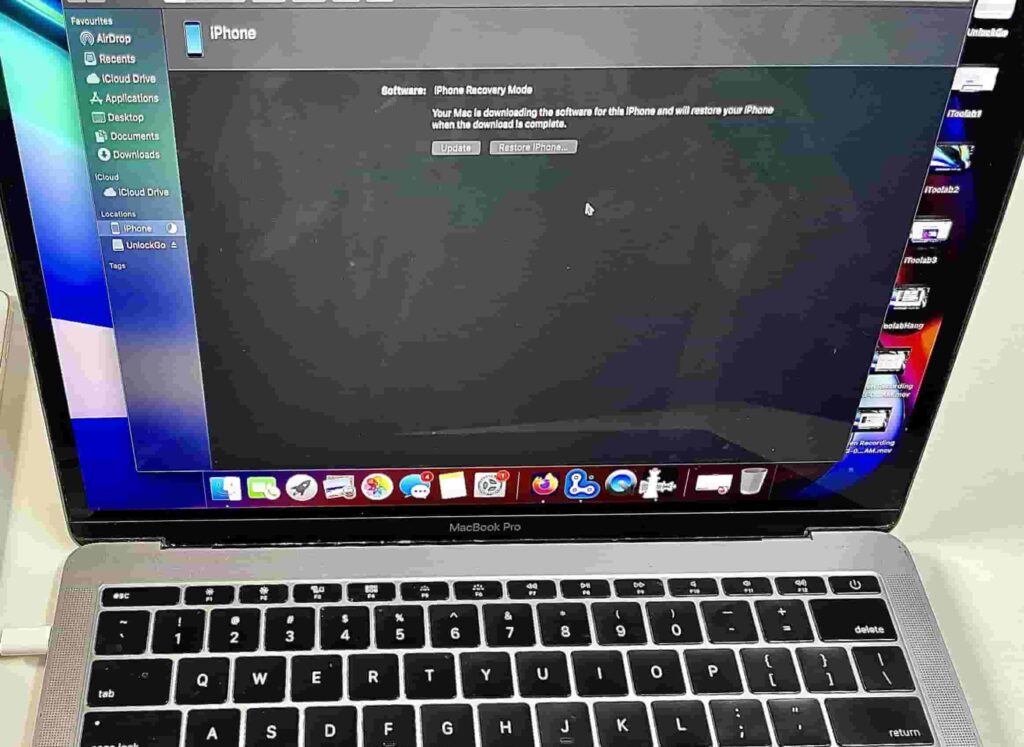
- Release the Power button but continue to hold the Home button until you see the message “iTunes has detected an iPhone in recovery mode”.
- Your iPhone is now in DFU mode.
For iPhone 7 and 7 Plus:

- Connect your iPhone to your computer using a USB cable and open iTunes if connected to windows laptop or a mac running macOS Mojave or earlier. On a Mac running macOS Catalina or newer, just open Finder.
- Press and hold the Power button and the Volume Down button at the same time for 8 seconds.
- Release the Power button but continue to hold the Volume Down button until you see the message “iTunes has detected an iPhone in recovery mode”.
- Your iPhone is now in DFU mode.
For iPhone 8 and later:

- Connect your iPhone to your computer using a USB cable and open iTunes if connected to windows laptop or a mac running macOS Mojave or earlier. On a Mac running macOS Catalina or newer, just open Finder.
- Press and quickly release the Volume Up button, then press and quickly release the Volume Down button.
- Press and hold the Side button (also known as the Power button) until the screen goes black.
- After the screen goes black, press and hold the Volume Down button while continuing to hold the Side button.
- Release the Side button after 5 seconds, but continue to hold the Volume Down button until you see the message “iTunes has detected an iPhone in recovery mode”.
- Your iPhone is now in DFU mode.
Entering DFU mode can be a helpful troubleshooting step if you are experiencing issues with your iPhone, such as being stuck on the Apple logo, a black screen, or other software issues. Keep in mind that entering DFU mode will erase all data from your iPhone, so be sure to back up your device before proceeding.
Difference between iPhone DFU mode and iPhone Recovery Mode
In DFU mode, the screen of the iPhone will be completely black and there will be no display of the apple logo. The device will not boot up normally as it does in recovery mode. This indicates that the firmware of the iPhone has been completely erased, and your iPhone is in a state where it can accept a new firmware update or restore.
In recovery mode, on the other hand, the screen of the iPhone will display the “Connect to iTunes” logo. This indicates that the device is in a state where it can be restored using iTunes. Unlike DFU mode, the firmware of the iPhone is not completely erased in recovery mode and thus considered to be more safer. Instead, the device is put into a mode where it can communicate with iTunes and receive a new firmware update or restore.
In short, the iPhone DFU mode is a deeper level of restore that allows the firmware to be completely erased and reinstalled. This can be helpful if your iPhone is experiencing issues that cannot be resolved with recovery mode. It is important to note that in both DFU mode and recovery mode, the iPhone will not function normally until it is restored or updated with a new firmware. These modes should only be used for troubleshooting purposes and when directed to do so by Apple support or a professional technician.